Wednesday 27 April 2011

Summer Texturing

At the start of the term I didn't have the confidence to UV map Summer, so we gave it to a second year animation student called Jure Bralic who was praised by Dan as being a competent UV mapper. After a couple of days he returned the Summer scene file to us we a full UV map ready for me to work with, he also made an annotated version of the map (shown below) and gave it to me to help me understand the layout and know what part is what.


The annotated layout was very useful and saved me valuable amounts of time which would have been spent on figuring out what part of the UV represented what part of the body, this could have taken as much as half a day so I'm incredibly grateful for Jure for taking the time to do that for me.


In terms of the actual texturing process for Summer I didn't encounter any problems, I did have a few minor problems where some parts of the UV's were a bit too squashed and close together making it hard to apply detail to the textures without having them look stretched once applied to the model, apart from that everything was absolutely fine and I got the textures finished within 2 days of starting them. I took some creative license to add my own little touches to the texture, the main thing I added was freckles to Summers face across her checks and nose (image below), it was only a subtle detail but I received a lot of positive feedback from people who saw the textured model, it's a detail that you don't consciously notice, but you can see it and it makes a huge difference to the look of the face.


I added a phong material to make the buttons look like they are made of plastic, it's important to make sure certain details like this exist otherwise the textures could fall flat and not work as well as they could.


This is a final render showing the finished texture on Summer, I gave a separate scene file to Laura Haile which contains the UV maps, Laura is currently rigging the characters so when we get the scene file back from her I can import the texture from this file into the one she gives us.

Saturday 23 April 2011

Revisiting Pandy

I wasn't happy with the way some parts of the textures looked on Pandy, after reviewing the model in Maya I found that the UV's I made were the cause for the issues I had found. First of all there was some texture stretching around the mouth as well as over the torso and the top of the head, some parts of the textures near the hand and wrist don't allign properly so I want to get them fixed. I figured the easiest way to do this would be to re-do the UV maps as they are the cause of the stretching issues I just stated.  I felt a lot more confident doing the UV's this time around and managed to make them a lot quicker and to a much better quality which would reduce the texture stretching and tearing.


I managed to create more accurate UV's and I arranged them a lot better for the UV snapshot; I read that a general rule of thumb is to use up as much space as possible in the UV Texture Editor when laying out the UV's to maximise their resolution and visibility in photoshop, the more space you use up the better.


I completely re-painted the textures and made everything to a higher standard than before. I feel a lot happier with the new results and think the textures now look a lot sharper as I exported them at a slightly higher resolution.


I showed this render to Karen and she was happy with how it looks, she could also spot the changes instantly which made me feel very good about my work knowing that my extra efforts that I did off my own back in my spare time actually paid off. I still don't feel particularly strong when it comes to characters, but I'm happy I can bring them to life to match Karens designs.

Tuesday 19 April 2011

Exterior UV Mapping and Texturing - Tree Bark

As I had already done the leaves I figured I might as well do the rest of the tree and get it finished, the trunk and branches were easy to UV map and unfold and I encountered no problems at all. I've started a habit of creating all of the textures the same way, by using a photograph from my camera and then working into it on photoshop, getting rid of any details I don't want to show and making sure it meets the visual design style we're aiming for.


This is the texture map for the main tree trunk, the textures for the branches will identical and will share the same source photograph. Because of the scattered pattern of the tree bark it is safe to re-use the same photo as the audience will not be able to see repeated textures, however if the photo was more basic and had a simpler design then this may not work.


This is a render showing the texture applied to the tree trunk, however the branches still only have the checker pattern applied along with the treehouse itself.


Once I applied the textures to the branches and took a render pic (shown above), I noticed a problem. The leaves directly above the treehouse look transparent as you can see the tree branch through them. I had no idea what was causing this and was starting to worry because if it was seen like this in the final film then people would notice it and question it immediately. I asked around and did lots of research online but couldn't figure out why I was having this problem, after fiddling around and trying extensively to fix the problem I finally found out what was causing it; the scene file I was working on had previously been worked on by James and he had set up different render layers, so as well as having the default 'masterlayer' which I thought I was working on already, there was also a 'Beauty' layer and a 'ambient occlusion' layer. I was working on the beauty layer, so the textures I had applied to the objects needed to be assigned to the other layers as well, once I did this I took a render and the problem had been solved.


The render above is the fixed problem, as you can see compared to the previous render, the leaves just above the treehouse are no longer transparent and work correctly. It was a huge relief to fix this problem as I thought I had done something wrong with my work, but luckily that was not the case.

Thursday 14 April 2011

Exterior UV Mapping and Texturing - Leaves

I've started working on the exterior shot for the film which is the opening of the film. I was most curious as to how the leaves would look the most as I have been scared that they might not look believable for the environment and may stand out too much, so the quell my own fears I decided to texture the leaves first.


To save time for myself, I combined all of the leaves into one geometry object and applied a new lambert to it, because each leaf is the same shape I only had to make one texture which would apply on each individual leaf.  I created the UV map by doing a planar projection, as the leaf is only a plane surface with no depth to it I didn't have to worry about unfolding it in the UV Texture Editor. The render above shows the first test that I done with the very first texture that I made, I felt that it worked pretty well and considering how dark I film would be and the type of lighting we will have, this will easily pass as being a believable bunch of leaves.


This is the first texture map that I made for the leaves, I made it by using a photograph of a leaf that I pulled from a tree that hangs over into my garden, I then adjusted the opacity and contrast levels and coloured into it in photoshop to create the necessary level of detail. However I felt that they needed some more colour tones in them because it looked too green.


This is the second version of the leaves texture, it has a slight more variation in the tonal colours and I put it some more yellow to help match the the leaves on the tree in my garden. Karen felt that the colour was still not quite right however so I went back to photoshop to sort it out.


This is the finished texture map that Karen has agreed on, it contains more yellow and the tiniest amount of red in the colour palette which has helped give it a more natural look, rather than it just being "oh it's a leaf, so it must be green".

Sunday 10 April 2011

Pandy UV Mapping

I decided to start UV mapping the characters first as they will be the hardest for me and require the most attention. I started with Pandy as his shape and design is a lot simpler than Summers so it will be best I start off small and then work my way up. 


I started the UV mapping by preparing the the geometry by splitting it into separate parts. I did this by using the 'pain select tool' and identify key areas which could break the geometry up into manageable UV sets. For example I selected all of the faces of the hand and then went to 'mesh' 'extract' so that each part of the body is separate but still joined together.


With each part of the body separated I could easily turn the other parts of the body on or off at will to help make the workspace easier to work in. I started by making a 'Planar Projection' of the torso which creates a flat 2D projection of the body's geometry in the UV Texture Editor. The only problem is that the body's UV's have not been unfolded yet which has to be done manually.


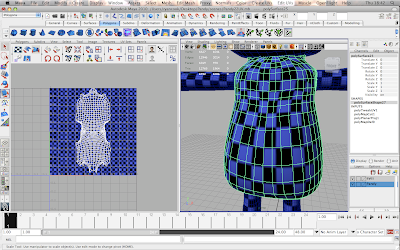
To unfold the UV's on the body I had to figure out the best way that the body could unwrap, I had to do this mentally and try to do it in my head which was quite difficult. Doing this I then have to decide the best places where to cut the UV edges which will determine how the body UV's will unfold in the Texture Editor, this can be seen in the image above where I have already unfolded the body. The UV's have layed out quite nicely and evenly which is great news at this stage. I applied a checker material to the geometry as well so that I can see how the UVs layout and if there are any problems, I also changed the colour from black and white to black and blue so that the UV edges are clearer to see as they are displayed in white.


Everytime I took a UV snapshot I had to resize it in the Texture Editor, I also had to make sure that the squares of the checker pattern on the model were all of equal size otherwise I would have textures with mixed quality where some areas would look higher quality and sharper than other areas.


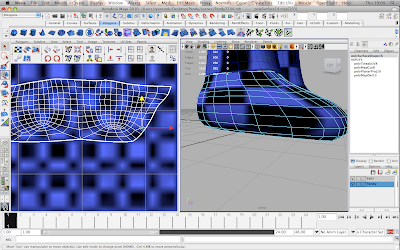
A problem that I hadn't anticipated by using the UV mapping method I have is that for Pandy, I separated his body into manageable parts to work with, but I had to match up the UVs to make sure that they would align properly. The image above you can see where the checker on the foot isn't properly lined up with the checker on the leg which may cause the textures to look weird and out of line with each other. It took some time but I figured out how to align the UV points manually in the Texture Editor which has given me a greater amount of control over my work. To fix it all I had to do was select the UV vertices in the Texture Editor and move them with the move tool which is incredibly easy to do.


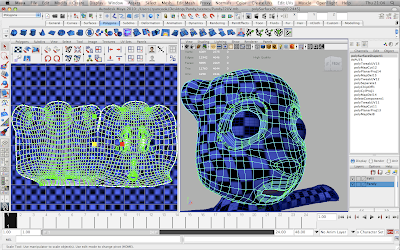
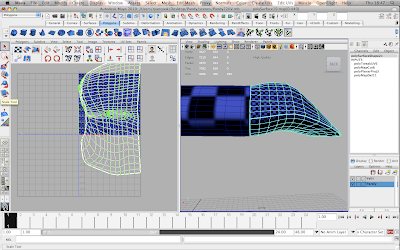
Creating the UVs for the head was the hardest challenge for this model, the reason for this is because the face will be the most featured part of Pandy in the animation so the textures need to look perfect and apply to the model with no problems at all, otherwise they will show in the animation and it will discredit my own abilities as well as the hard work of the rest of the group which wouldn't be cool. I cut the UV edges along the top of the head from one ear to the other and down the side of the head, I was unsure of how this would work but it turned out pretty well. The only thing is I wont know how well the UV mapping has been done until a start making the textures and applying them to the model. 


Above shows all of the UV's for each part of the body layed out and resized in the texture editor, i'm a little worried about the stretched checker on the body but if it does cause a problem then I can adjust the UV's and try again.


In photoshop I mocked up a texture quickly as I was eager to see how it worked and looked on Pandy, I grabbed a sack texture off of google images to save my time so I don't have to source my own texture images and worked into it on photoshop to add my own style to it. I then applied it to the model in Maya, but I had to tweak a few things before it would be ready.


I wanted to set up a bump map for the character texture so that the texture would not appear flat on Pandy but have some depth and believability to it. The hypershade is where I set up the bump map and applied it to the lambert material which was the source of my texture file, this can be seen above.


The render is the first test of the texture being applied to Pandy, the only detail was on the body whereas the rest of the character has just flat colours to represent how it would basically look.


The render above is a more refined one I did over the course of a couple of days, the textures are made up of painting in photoshop and using photos of material I took on my camera to represent the bumpiness of the sack/knitted material.


I experimented with some lights and their colour to see how the textures would look with the lighting that we are planning to use in the film. I felt it was important for me to see how the textures would look in the scene set up to be as close as possible to our final result to make sure that the way it looks is how we want it so I can make any changes now, rather than it being 2-3 weeks before deadline and having Karen wanting changes to be made because it doesn't look right.


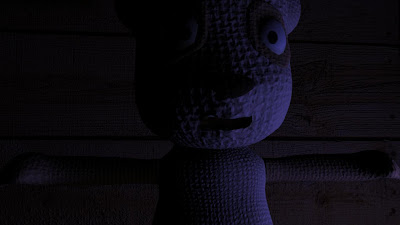
I was taking renders from as many possible angles, paying primary focus to the front views and close-ups that would be seen in the animation. Karen also said that his eyes look too flat and washed out and wondered if I could make it have some reflectivity so it glints when the light shines on it. I went away and changed this by taking a separate UV snapshot of the eyes and making a new eye texture, I applied a blinn material to the eyes and attached the new eye texture to that to give the eyes the effect that Karen had requested.


And here's one more render showing more clearly the stage that I have come to with the character textures, you can also see the updated eyes with the glint on them.

Saturday 2 April 2011

Progress check with Dan

We had a progress chat with Dan today, he wanted to know how we are getting on and if we have any problems or issues that need sorting out before we get too far into the final term. The main problem for me was that I was worried about UV mapping the characters, I've always been more of a prop and environment person so I have been worried i'll doing something wrong or mess up, also I have more work to do than I originally realised, with a huge selection of props for both interior and exterior shots as well as the characters and the environments themselves. Dan, Karen and Karl suggested that we outsource some of the work to other people looking to fill up their folders, which is a good idea as it will give me a little more time to work and make some really nice textures instead of rushing and only doing average ones, however this was meant to be my main task of the year, my main goal which I could truly show my skill with and it's a little disheartening to know I've got to share out the workload with others, this was a chance for me to prove myself in some respects that I am a competent texture artist and UV mapper, but realistically I wont be able to finish everything myself. I'll start working straight away and in the mean time we'll have to seek assistance from other people.

In terms of our progress as a group, we are a little behind the other groups. Other groups have already started their animation and we don't have our character rigs finished yet. I think as long as we work our butts off and get our rigged characters soon then we will be fine and able to finish our film without much trouble.